빈 생명주기 콜백이란?
'빈 생명주기 콜백'은 스프링 빈이 생성되고 소멸될 때 즉 초기화 작업과 종료 작업을 수행할수 있도록 하는 것이다.
자세하게는 스프링에서 빈의 생성, 초기화, 소멸과 관련된 작업을 수행할 수 있도록 하는 기능이다.
초기화 작업과 종료 작업이 무슨 작업이지??
1. 애플리케이션 서버가 시작될때 DB 와 연결설정하는 초기화 작업
보통 애플리케이션은 관계형 데이터베이스를 연결하는데 오래걸리기 때문에
애플리케이션 실행시(서버가 시작될 때) 미리 DB와 애플리케이션을 연결시켜놓는다
그렇게 하면 여러 요청이 들어올때 새롭게 DB와 연결할 필요가 없어진다.
2. 요청이 올때마다 미리 생성된 DB 연결을 재활용
다른 고객의 요청이 올때 DB와 연결을 재사용함으로써 성능이 향상되는 장점이 있다.
3. 서버 종료 시 DB연결 미리 끊는 종료 작업
또한 종료될때도 서버가 확 꺼지는게 아니라 애플리케이션 컨텍스트(ApplicationContext) 가 종료될때 DB와의 연결도 함께 미리 종료하여 서버를 종료한다. 그렇게 되면 정상적이고 안전하게 종료 처리가 된다.
이러한 초기화 작업과 종료 작업은 어떻게 진행되는건지 예제코드로 알아보자
예제코드니 가짜 네트워크를 연결해보고 단순히 문자로만 출력되도록 해보기
[예제코드]
서비스 시작할때 호출되는 connect() 메서드와 메세지를 호출하는 call() 메서드
그리고 서비스가 종료될때 disconnect() 메서드를 호출하여 연결을 끊어야한다.
public class NetworkClient {
    private String url;

    //생성자
    public NetworkClient() {
        System.out.println("생성자 호출, url = " + url);
        connect();
        call("초기화 연결 메시지");
    }

    public void setUrl(String url) {
    	this.url = url;
    }

	//서비스 시작시 호출하는 메서드 : connect() 와 call()
    public void connect() {
    	System.out.println("connect: " + url);
    }

	//메세지:연결한 서버에 메세지를 던져주는 메서드
    public void call(String message) {
    	System.out.println("call: " + url + " message = " + message);
    }

	//서비스 종료시 호출되는 메서드 : disConnect()
    public void disconnect() {
    	System.out.println("close: " + url);
    }
}
public class BeanLifeCycleTest {
@Test
public void lifeCycleTest() {
//빈 생명주기
//1. 스프링 컨테이너 생성
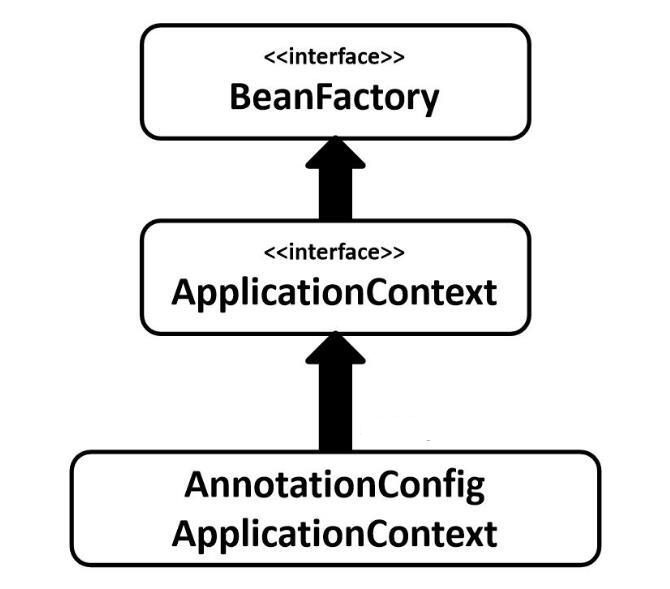
ConfigurableApplicationContext ac = new AnnotationConfigApplicationContext(LifeCycleConfig.class);
//컨테이너로부터 빈 조회
//(이미 LifeCycleConfig을 스프링 컨테이너에 넣었고 networkClient()에서 NetworkClient 빈을 등록했기떄문에 조회만 함)
NetworkClient client = ac.getBean(NetworkClient.class);
ac.close(); // ApplicationContext > ConfigurableApplicationContext > AnnotationConfigApplicationContext
}
@Configuration
static class LifeCycleConfig {
//2. 빈 생성
@Bean
public NetworkClient networkClient() {
NetworkClient networkClient = new NetworkClient();
networkClient.setUrl("http://hello-spring.dev");
return networkClient; //리턴시 메서드 호출되는 시점에 객체생성이 되고 빈이 등록된다.
}
}
}
[로그 출력]
생성자 호출, url = null
connect: null
call: null, message = 초기화 연결 메세지
생성자 부분을 보면 url 값은 null이 출력된다.
왜일까 networkClient.setUrl("http://hello-spring.dev"); 을 통해 값을 넣었는데 왜 null이 나올까??
스프링 빈의 생명주기를 보면
객체 생성 이후 의존관계 주입이 이루어진다.
즉 객체 생성은 되었으나 의존관계 주입이 이루어지지 않았기때문에 url 값이 null로 출력이 되는 것!
스프링 빈은 객체를 생성하고 의존관계 주입이 모두 끝난 이후에 데이터를 사용할 준비가 된다.
- 스프링 빈의 생명주기
- 스프링 컨테이너 생성
- 스프링 빈 생성
- 의존관계 주입
- 초기화 콜백 사용 : 초기화 작업
- 객체 생성 및 의존관계 주입 이후 객체를 사용하기 위해 필요한 추가 작업 정도로만 알기
- 의존관계 주입된 후 초기화 콜백 메서드가 호출되므로 개발자에게 초기화 시점을 알려주는 목적
- 소멸 전 콜백 : 종료작업
- 스프링 컨테이너가 종료되기 직전에 소멸 콜백을 준다. 따라서 안전하게 종료 작업을 진행할 수 있다.
- 소멸 콜백 메서드 호출하여 개발자에게 알려줄 수 있다.
- 스프링 종료 : 애플리케이션 종료될때 스프링 컨테이너 종료, 남아있는 빈들의 소멸작업 수행
이렇게 초기화 콜백은 빈이 생성되고 의존관계 주입이 완료 후 호출이 되고
소멸전 콜백은 빈이 소멸되기 직전에 호출되는것
참고로 객체 생성과 초기화를 분리하는게 일반적으로 객체 지향 프로그램의 원칙 중 하나인 단일책임 원칙을 따른다
이렇게 명확히 나누는것이 유지보수 관점에서 좋은 설계이다.
- 객체 생성은 생성자에서 필수 정보를 파라미터로 받고 메모리에 할당하여 객체를 생성하는 책임을 가진다
- 초기화는 생성된 값을 동작하도록 별도의 초기화 메소드로 분리하여 외부 커넥션을 연결하는 작업을 가진다
- 스프링은 3가지 방법으로 빈 생명주기 콜백을 지원한다.
- 인터페이스(InitializingBean, DisposableBean)
- 설정 정보에 초기화 메서드, 종료 메서드 지정
- @PostConstruct, @PreDestroy 어노테이션
빈 등록 시 초기화 메서드와 소멸 메서드
InitializingBean, DisposableBean 인터페이스
2003년에 나온 스프링 초창기 방법이라 거의 사용하지는 않음.
- InitializingBean 는 afterPropertiesSet() 메서드로 초기화를 한다.
- DisposableBean 는 destroy() 메서드로 소멸을 한다.
public class NetworkClient implements InitializingBean, DisposableBean{ //초기화 빈, 종료 빈

	private String url;

	//생성자
	public NetworkClient() {
		System.out.println("생성자 호출, url = " + url);
	}

	//외부에서 setter로 넣을 수 있도록
	public void setUrl(String url) {
		this.url = url;
	}

	//서비스 시작시 호출하는 메서드
	public void connect() {
		System.out.println("connect: " + url);
	}

	//연결된 상태에서 부를 수 있는 메서드 (연결한 서버에 메세지를 던져준다)
	public void call(String message) {
		System.out.println("call: " + url + ", message = " + message);
	}

	//서비스 종료시 호출되는 메서드
	public void disConnect() {
		System.out.println("close: " + url);
	}

	//InitializingBean 의존관계 주입이 끝나면 호출하는 '초기화 메서드'
	@Override
	public void afterPropertiesSet() throws Exception {
		System.out.println("NetworkClient.afterPropertiesSet");
		connect();
		call("초기화 연결 메세지");
	}

	//DisposableBean 종료시 호출하는 '소멸 메서드'
	@Override
	public void destroy() throws Exception {
		System.out.println("NetworkClient.destroy");
		disConnect();
	}
}
[테스트 클래스는 그대로]
public class BeanLifeCycleTest {

	@Test
	public void lifeCycleTest() {
		ConfigurableApplicationContext ac = new AnnotationConfigApplicationContext(LifeCycleConfig.class);
		NetworkClient client = ac.getBean(NetworkClient.class); //빈조회
		ac.close(); // ApplicationContext > ConfigurableApplicationContext > AnnotationConfigApplicationContext
	}

	@Configuration
	static class LifeCycleConfig {

		@Bean
		public NetworkClient networkClient() {
			NetworkClient networkClient = new NetworkClient();
			networkClient.setUrl("http://hello-spring.dev");
			return networkClient;
		}
	}
}
[결과로그]

빈 등록 초기화, 소멸 메서드 지정하기
@Bean(initMethod = "init", destroyMethod = "close")
설정 정보 사용 특징
- 초기화, 소멸전 콜백 메서드 이름을 자유롭게 정할 수 있다.
- 스프링 빈이 스프링 코드에 의존하지 않는 장점이 있다. (NetworkClient 클래스 코드를 보면 알 수 있음)
- 코드가 아니라 설정 정보를 사용하기 때문에 코드를 고칠 수 없는 외부 라이브러리에도 초기화, 종료 메서드를 적용가능하다.
public class NetworkClient{

	private String url;

	//생성자
	public NetworkClient() {
		System.out.println("생성자 호출, url = " + url);
	}

	//외부에서 setter로 넣을 수 있도록
	public void setUrl(String url) {
		this.url = url;
	}

	//서비스 시작시 호출하는 메서드
	public void connect() {
		System.out.println("connect: " + url);
	}

	//연결된 상태에서 부를 수 있는 메서드 (연결한 서버에 메세지를 던져준다)
	public void call(String message) {
		System.out.println("call: " + url + ", message = " + message);
	}

	//서비스 종료시 호출되는 메서드
	public void disConnect() {
		System.out.println("close: " + url);
	}

	//초기화 콜백메서드
	public void init() {
		System.out.println("NetworkClient.init");
		connect();
		call("초기화 연결 메세지");
	}

	//소멸전 콜백메서드
	public void close() {
		System.out.println("NetworkClient.close");
		disConnect();
	}
}
[테스트 클래스 BeanLifeCycleTest]
public class BeanLifeCycleTest {

	@Test
	public void lifeCycleTest() {
		ConfigurableApplicationContext ac = new AnnotationConfigApplicationContext(LifeCycleConfig.class);
		NetworkClient client = ac.getBean(NetworkClient.class); //빈조회
		ac.close(); // ApplicationContext > ConfigurableApplicationContext > AnnotationConfigApplicationContext
	}

	@Configuration
	static class LifeCycleConfig {

		@Bean(initMethod = "init", destroyMethod = "close")
		public NetworkClient networkClient() {
			NetworkClient networkClient = new NetworkClient();
			networkClient.setUrl("http://hello-spring.dev");
			return networkClient;
		}
	}
}
[결과로그]

마지막으로 어노테이션 사용하는걸 권장
@PostConstruct, @PreDestroy 사용하기
- 최신 스프링에서 가장 권장하는 방법
- 어노테이션만 추가하면 되므로 가장 편리
- 컴포넌트 스캔과 어울린다.
- 유일한 단점은 외부 라이브러리와 적용을 못한다. 코드를 고쳐야하기 때문!
- 만약 외부 라이브러리를 초기화, 종료해야한다면 두번째 방법대로 @Bean 의 initMethod , destroyMethod 사용하기
위의 NetworkClient 클래스 코드에서 초기화, 종료 메서드에 어노테이션만 추가하기
@PostConstruct
public void init() {
    System.out.println("NetworkClient.init");
    connect();
    call("초기화 연결 메세지");
}

@PreDestroy
public void close() {
    System.out.println("NetworkClient.close");
    disConnect();
}
[테스트 클래스 BeanLifeCycleTest]
public class BeanLifeCycleTest {

	@Test
	public void lifeCycleTest() {
		ConfigurableApplicationContext ac = new AnnotationConfigApplicationContext(LifeCycleConfig.class);
		NetworkClient client = ac.getBean(NetworkClient.class); //빈조회
		ac.close(); // ApplicationContext > ConfigurableApplicationContext > AnnotationConfigApplicationContext
	}

	@Configuration
	static class LifeCycleConfig {

		@Bean
		public NetworkClient networkClient() {
			NetworkClient networkClient = new NetworkClient();
			networkClient.setUrl("http://hello-spring.dev");
			return networkClient;
		}
	}
}
[결과로그]

'공부' 카테고리의 다른 글
| Spring | 싱글톤 패턴 적용하기, static, 싱글톤 문제점 (0) | 2024.01.08 |
|---|---|
| Spring | 관심사의 분리 (AppConfig)와 의존성 주입 , AppConfig 리팩터링 (0) | 2023.12.19 |
| Spring | List, Map 으로 빈 모두 조회하기 (0) | 2023.12.01 |
| Spring | 다양한 의존관계 주입 방법 (0) | 2023.11.30 |
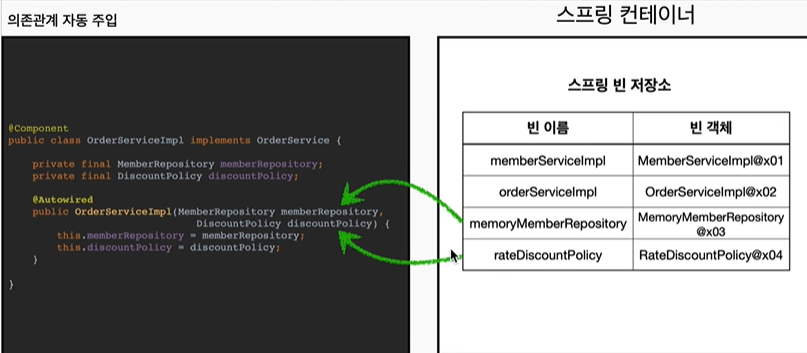
| Spring | @ComponentScan , @Autowired 의존관계 자동주입 (0) | 2023.11.29 |