UserRepository, AdminRepository 인터페이스 생성하기
각각 JpaRepository 상속받기
extends JpaRepository<User, Integer>
extends JpaRepository<Admin, Integer>
[ RegistrationController]
@Autowired
private UserRepository userRepo;

@Autowired
private PasswordEncoder passwordEncoder;
패스워드 암호화 필요
@Autowired
private PasswordEncoder passwordEncoder;
패스워드 암호화 PasswordEncoder 설정은 [ SecurityConfig ] 에서 설정.
@Configuration 어노테이션 추가 (클래스 안에 등록할 객체 또는 메소드가 있음을 표시)
//이 메소드를 스프링에 빈(객체 메소드)로 등록
@Bean
public PasswordEncoder encoder() {
return new BCryptPasswordEncoder(); // 패스워드 인코더 객체
}
@Controller
@RequestMapping("/register")
public class RegistrationController {

	@Autowired
	private UserRepository userRepo;

	@Autowired
	private PasswordEncoder passwordEncoder;

	@GetMapping
	public String register(User user) {
		return "register"; //가입하기 화면 뷰 보여주기
	}

}
[ register.html ]
<!-- 가입하기 -->
<!DOCTYPE html>
<html xmlns:th="http://www.thymeleaf.org">
<head th:replace="/fragments/head :: home-customer">
</head>
<body>
<nav th:replace="/fragments/nav :: nav-customer"></nav>
<main class="container-fluid mt-5"> <!-- fluid는 가로 해상도에 상관없이 100%의 width-->
<div class="row"> <!--한 줄-->
<form method="post" th:object="${user}" th:action="@{/register}">
<div th:if="${#fields.hasErrors('*')}" class="alert alert-danger">입력 내용을 확인해주세요</div>
<div class="title">Register</div>
<div id="msg" class="msg"> </div>
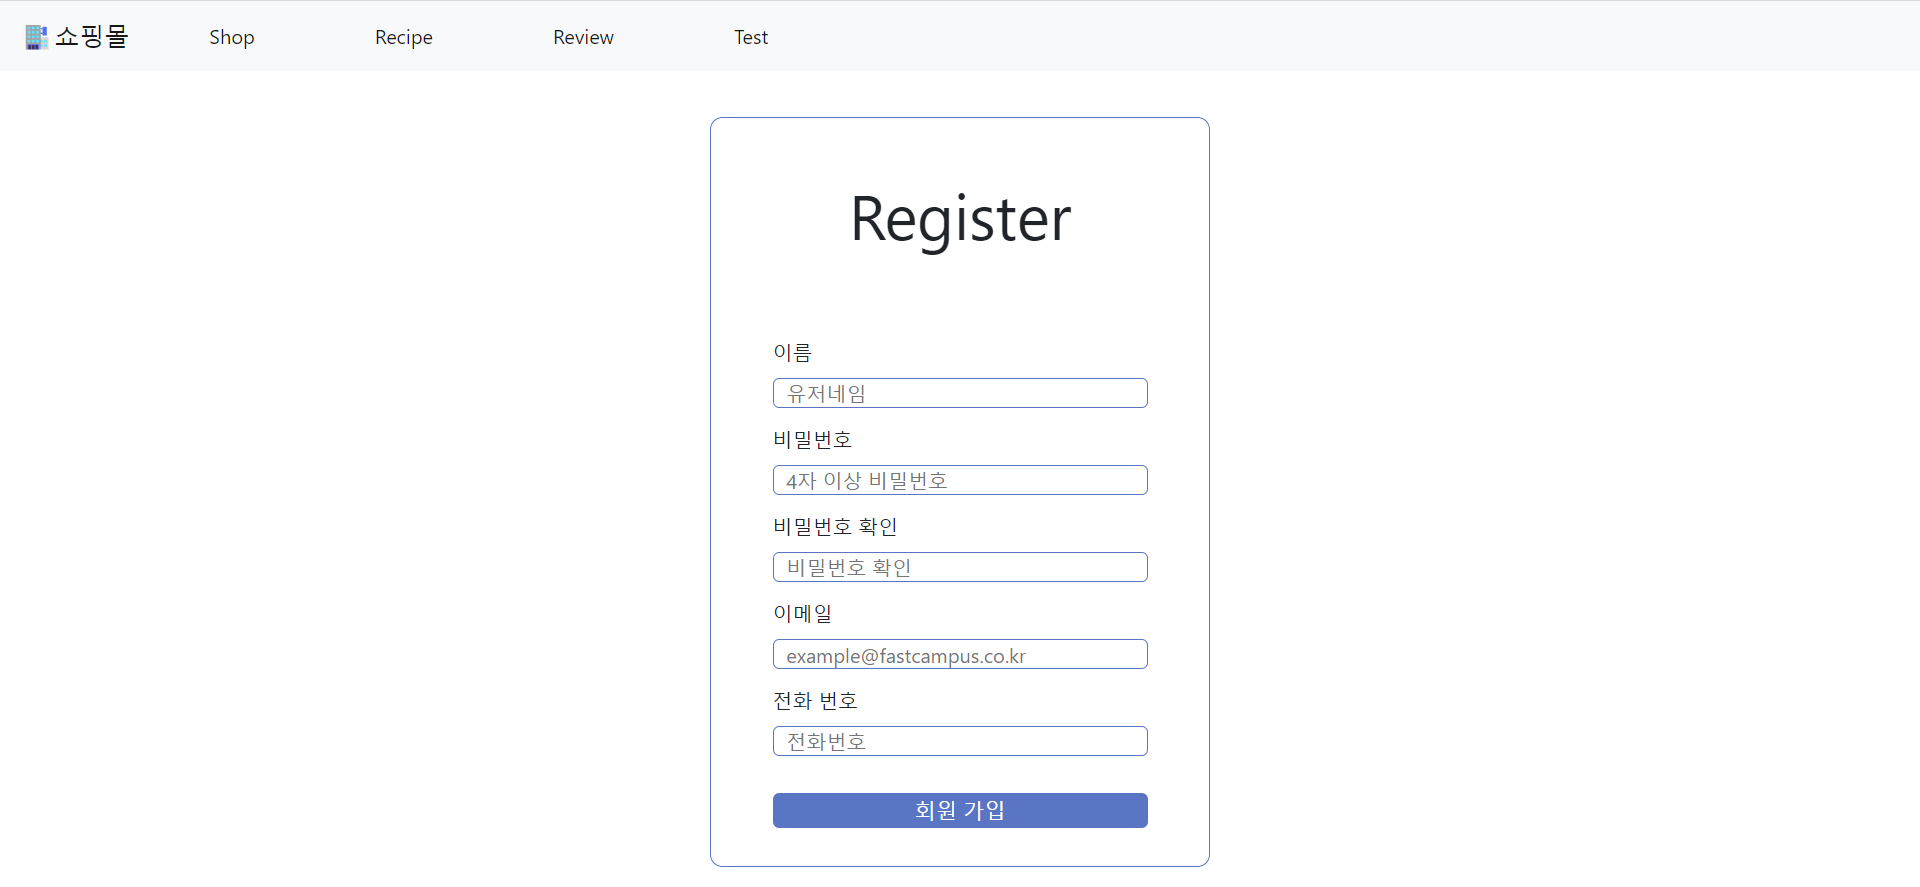
<label for="">이름</label>
<input class="input-field" th:field="*{username}" type="text" placeholder="유저네임">
<span class="error" th:if="${#fields.hasErrors('username')}" th:errors="*{username}"></span>
<label for="">비밀번호</label>
<input class="input-field" th:field="*{password}" type="password" placeholder="4자 이상 비밀번호">
<span class="error" th:if="${#fields.hasErrors('password')}" th:errors="*{password}"></span>
<label for="">비밀번호 확인</label>
<input class="input-field" th:field="*{confirmPassword}" type="password" placeholder="비밀번호 확인">
<span class="error" th:if="${#fields.hasErrors('confirmPassword')}" th:errors="*{confirmPassword}"></span>
<label for="">이메일</label>
<input class="input-field" type="email" th:field="*{email}" placeholder="example@fastcampus.co.kr">
<span class="error" th:if="${#fields.hasErrors('email')}" th:errors="*{email}"></span>
<button>회원 가입</button>
</form>
<!-- 7/12 --><!--utext는 ck에디터로 입력해서 DB에도 어떤태그쓴지 알기위해-->
</div>
</main>
<footer th:replace="/fragments/footer :: footer"></footer>
</body>
</html>
<form method="post" th:object="${user}" th:action="@{/register}">
method="post"
th:object="${user}" - user객체 매핑해주는
th:action="@{/register}" - requestMapping("/regiser")
form 태그안의 input 태그에는 th:field="*{ }"
<form method="post" th:object="${user}" th:action="@{/register}">
    <input class="input-field" th:field="*{username}">
</form>
th:object에 설정해 준 객체의 내부와 매칭해줌. user객체의 username
th:field="${user.username}" 이라고 작성해도 되지만, 상위 form 태그에서 user을 정의했으므로 $ 대신 *을 쓰고 필드명만 써주면 된다
[ 유효성검사 ]
전체 에러 유효성검사
<div th:if="${#fields.hasErrors('*')}" class="alert alert-danger">입력 내용을 확인해주세요</div>
각 input에 대한 유효성검사
<span class="error" th:if="${#fields.hasErrors('username')}" th:errors="*{username}"></span>
회원가입 화면
http://localhost:8080/register
post매핑
@PostMapping
public String register(@Valid User user, BindingResult bindingResult,Model model) {
//1. 유효성 검사 틀릴경우
if(bindingResult.hasErrors()) {
return "register";
}
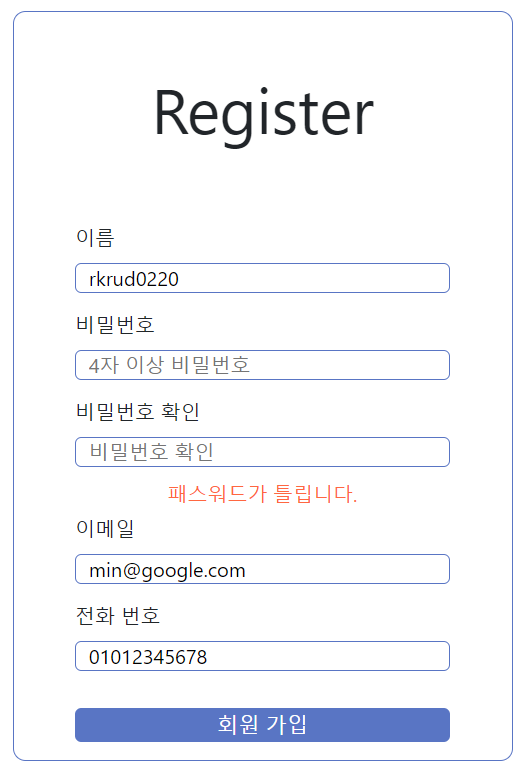
//2. 비밀번호 확인시 안맞을 경우
if(!user.getPassword().equals(user.getConfirmPassword())) {
model.addAttribute("passwordNotMath", "패스워드 확인이 틀립니다.");
return "register";
}
//3. 패스워드 암호화 해서 입력함
user.setPassword(passwordEncoder.encode(user.getPassword())); //패스워드 가져오서 비번 인코더
//4. DB에 새 유저 저장
userRepo.save(user);
return "redirect:/login";
}
BindingResult : 유효성 검사
user.setPassword(passwordEncoder.encode(user.getPassword())) :
비번 가져와서 인코더(알아 볼수 없도록 만들어주는) 해주고 다시 저장
userRepo.save(user); 마지막 까먹지 않고 최종 저장해주기
비밀번호 확인 에러는 내가 설정해주기! DB에 없어서 유효성 검사 에러 안뜸
[ register.html ]
th:if ="${#fields.hasErrors('passwordNotMath')}"
오류
해결
th:if="${passwordNotMatch}" 괄호 잘보기.
비밀번호 확인을 다르게 적었을 때 유효성 검사가 잘 적용되었음!
[ 가입 후 DB ]

= 패스워드는 암호화 돼서 저장된 것을 확인할 수 있다.
'Spring boot | 쇼핑몰 만들기 | 어글리 마켓 > security | 로그인' 카테고리의 다른 글
| Spring Boot | AJAX에 csrf 적용방법 (0) | 2022.05.13 |
|---|---|
| Login 로그인 페이지 (0) | 2022.05.13 |
| 인증(유저,관리자) 하는 클래스 UserDetailsServiceImpl (0) | 2022.05.12 |
| Entity User, Admin 클래스 생성 (0) | 2022.05.12 |
| 스프링 시큐리티 적용하기 | 유저,관리자 테이블 생성 (0) | 2022.05.12 |